 Upgrade Storage
This is an old revision of the document!
연표(Timelines)는 내 컬렉션 안의 아이템을 시각화 시켜줄 수 있는 좋은 방법으로 MIT의 'SIMILE Timeline project'를 통해 개발된 기술이다.
이 페이지에 있는 대부분의 정보는 내 타임라인 상의 동영상에서도 제공하고 있으므로 동영상을 보려면 이미지를 클릭한다.
연표 만들기(Creating Timelines)
타임라인을 만들려면 Zotero에서 톱니바퀴 모양의 '동작(Action)' 아이콘을 클릭, “연표 만들기(Create Timeline)”를 선택하면 내가 현재 보고 있는 컬렉션을 연표로 만들어 보여준다.
연표 이해하기(Understanding The Timeline)
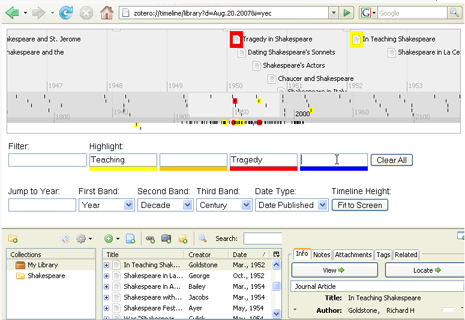
Zotero 연표(Timeline)는 회색 가로축으로 배열하는 방식으로 세 단계로 구성되어있다. 기본적으로 밑에서 위까지 아이템이 점차 세분화되어 보여진다. 중간과 가장 하단 영역의 중앙에 밝은 회색 부분은 연표 상에서 아이템을 찾아볼 수 있는 중심축으로 생각하면 된다. 이 영역 내의 아이템들은 가장 상단 영역에 상세하게 나타난다.
Moving Around Your Timeline
Moving your mouse pointer over the timeline changes it to a hand. If you click with the hand you can drag your way through the timeline. You will move considerably faster through your collection if you move within the lower bands.
Besides dragging your way through the timeline, you can also double click on a spot within one of the bands to zoom to that specific time point. You can also enter a year into the “Jump to Year” field, located below the timeline, to scroll immediately to a specific year.
If you have your Zotero pane open, you can click on one of your items in the timeline, and it will automatically select that item within your Zotero collection. This is a convenient way to take notes about any item while viewing it in chronological context against other items in your collection.
Manipulating Timelines
You can manipulate the representation of your timeline in several ways with the tools displayed below.
| Timeline settings |
 |
Filtering your results
If you want to reduce the number of items visible in your timeline, use a filter. To display items that only include a specific word, number, or character, simply enter that data into the filter box.
Highlighting Keywords
The highlighting function makes it easy to see trends at a glance. Simply enter a term into one of the Highlight boxes. The timeline will then highlight the title of each item containing your term with the corresponding color. This offers a quick way to visualize changes in terminology within the titles of your items.
Changing the bands
If you want to zoom in to examine specific dates of publication, or zoom out to see broader trends, change Timeline Band settings. To change the settings, simply select a time range in the First, Second, and Third Band drop-down menus in the second row. Timeframes range from day to millenia.
Selecting Source Dates
By default, Zotero uses the dates of publication from your items to build your timeline. In most cases this is the most useful information through which to explore your collection. But by selecting the options in the “Date Type” drop-down menu, you can also view your collection through the dates of added or modified items. This allows you to see your patterns of research, e.g. the kinds of things you added and when you added them.