 Upgrade Storage
Collections and Tags
Items in Zotero libraries can be organized with collections and tags.
Collections allow hierarchical organization of items into groups and subgroups. The same item can belong to multiple collections and subcollections in your library at the same time. Collections are useful for filing items in meaningful groups (e.g., items for a particular project, from a specific source, on a specific topic, or for a particular course). You can import items directly to a specific collection or add them to collections after they are already in your library.
Tags (often called “keywords” in other contexts) allow for detailed characterization of an item. You can tag items based on their topics, methods, status, ratings, or even based on your own workflow (e.g., “to-read”). Items can have as many tags as you like, and you can filter your library (or a specific collection) to show items having a specific set of one or more tags.
Tags are portable, but collections are not. Copying items between Zotero libraries (My Library and group libraries) will transfer their tags, but not their collection placements. Both organizational methods have unique advantages and features. Experiment with both to see what works best for your own workflow.
Collections
The Zotero Collections Model
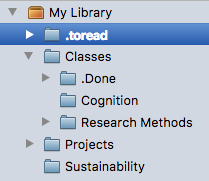
It is important to understand that items can belong to multiple collections and subcollections. Adding an item to multiple collections does not duplicate the item. In this sense, collections are more like music playlists than folders in your computer filesystem. Just as a single song can be added to more than one playlist, a single item in a Zotero library can be added to multiple collections.
The library root — “My Library” for personal libraries or the group name for group libraries — always shows all items in the library, and items are duplicates only if they appear multiple times in that view.
Creating Collections
Click the “New Collection…” button (![]() ) above the left pane in Zotero to add a new collection. You can also right-click on “My Library” or the name of a Group library and choose “New Collection…” to add a new collection. The new collection will appear as a folder under “My Library” or the selected Group library.
) above the left pane in Zotero to add a new collection. You can also right-click on “My Library” or the name of a Group library and choose “New Collection…” to add a new collection. The new collection will appear as a folder under “My Library” or the selected Group library.
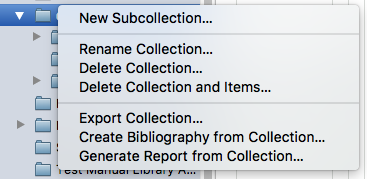
Subcollections can be created by dragging and dropping an existing collection onto another collection or by right-clicking a collection and choosing “New Subcollection…”. You can convert a subcollection into a top-level collection by dragging it out of the collection and dropping it into empty space in the left Zotero pane.
You can drag collections between Zotero libraries in the left pane. If you have editing privileges for the destination library, the collection (and all of its items and subcollections) will be added to the destination library.
Adding Items to Collections
New items are automatically saved into the collection selected at the time. When saving from the browser, you can choose a different collection from the popup after clicking the save button.
To add existing items in your library to a collection, select them in the center pane and drag them onto the collection in the left pane. By default, the items will be added to the new collection but won't be removed from their original location.
To move items between collections, hold down Cmd (Mac) or Shift (Windows/Linux) when dragging items to the new collection. Remember that the “My Library” view always shows all items in your library, so you cannot “move” items out of this view. To see only items that do not belong to any collection in your library, open the Unfiled Items special collection.
Renaming Collections
Right-click on the collection and choose “Rename Collection…” to give a collection a new name. Collections are sorted alphabetically in your library. You can use punctuation marks to sort collections to the top of the list.
Deleting Collections
Right-click on the collection and choose “Delete Collection…” to remove a collection from your library. Deleting a collection does not delete the items in the collection. Items are still accessible by clicking on My Library or the Group library name.
Deleting a collection will also delete its subcollections (but not the items in them).
To delete both the collection and its items, right-click on the collection and choose “Delete Collection and Items…”.
Removing Items from a Collection
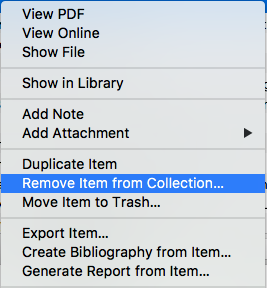
Select a collection in the left Zotero pane, then select the items in the center pane that you want to remove from the collection. Press the Delete key to remove the items from the collection. You can also right-click the selected items and choose “Remove Item(s) from Collection…”. This only removes the items from the selected collection, not from “My Library” or any other collections.
To delete an item in a collection, select the items in the collection, right-click on them, and choose “Move Item(s) to Trash…”. When “My Library” or a Group library name is selected in the left Zotero pane, pressing the Delete key will also move items to the trash. When a collection or subcollection is selected, press Cmd/Ctrl-Delete to move the items directly to the trash.
Identifying Collections an Item is In
To see all the collections an item is in, select the item and then hold down the Option (Mac), Control (Windows), or Alt (Linux) key. Keep the key pressed. After a brief delay, the collections containing the item will be highlighted.
Saved Searches
Saved Searches are like smart collections. They automatically update to include all the items in your library that meet the search criteria. For example, you can create a “To Read” Saved Search with the criteria Tag is not read. Then, opening the Saved Search will show you all of the items in your library that you haven't read yet (i.e., the ones without a “read” tag). To mark an item as read, add the “read” tag to it.
Special Collections
My Publications

The My Publications special collection allows you to share your own research work (including items, notes, and attachment files) publicly with the world. Drag your publications to this collection to launch the My Publication wizard, which will allow you to select which notes, links, and files are shared.
Duplicate Items
The Duplicate Items special collection shows items that Zotero has identified as potential duplicates. You can use this collection to review and merge duplicate items. For details on how duplicate detection works and how to merge duplicates, see here.
Unfiled Items
Items that are not in any collection can be found in the “Unfiled Items” special collection at the bottom of the collections list in the left Zotero pane. If “Unfiled Items” collection is not visible, right-click on “My Library” or the Group library name and choose found under “My Library”. This folder can also be selected by right-clicking “My Library” and selecting “Show Unfiled Items”.
Trash
When you delete an item by pressing Delete (Cmd/Ctrl-Delete in a collection) or by right-clicking and choosing “Move Item(s) to Trash”, they are moved to the Trash special collection. By default, items remain in the Trash for 30 days (you can adjust this period in the General pane of Zotero preferences), after which they are deleted permanently. You can restore an item from the Trash to your library by selecting it in the Trash and clicking the “Restore to Library” button (or by right-clicking and choosing “Restore to Library”). You can delete an item permanently by clicking the “Delete Permanently…” button (or by right-clicking and choosing “Delete Item…”.
Show Items from Subcollections
By default, items added to a subcollection do not automatically appear in parent collections. This can be changed by toggling “Show Items from Subcollections” in the View menu. This setting is not currently available in the online library.
Tags
The Tag Selector
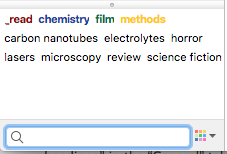
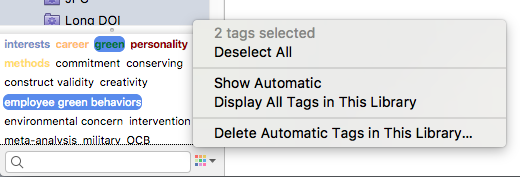
The tag selector is located at the bottom of the left Zotero pane. It shows all the tags that have been assigned to the items currently shown in the center pane (i.e., items in the currently selected collection that match the current search). To show all of the tags present in the library, click the multi-color button in the lower-right corner of the tag selection and choose “Display All Tags in This Library”. Tags not assigned to currently shown items are greyed out. You can filter items by their tags by clicking on one more tags in the tag selector. Only items that have all of the selected tags will be shown in the center pane. As you apply filters, the list of tags in the tag selector will be updated to show only the tags assigned to currently visible items. Clicking on a tag a again will deselect it. To deselect all tags at once, click the multi-color button and choose “Deselect All”.
The filter box at the bottom of the tag selector can be used to search for tags. Type in the search box to see all tags that match. To go back to viewing all the tags in the collection, press the Escape key or click the “X” button on the right.
Adding Tags to Items
To add a tag to an item, select the item in the center Zotero pane, and then click the Tags tab in the right-hand pane. Click the Add button, type the tag name, and type Enter/Return. You can rename a tag by clicking on it and typing the new name. Once you have added the tag it will also appear in the tag selector in the bottom left.
As you type, you will be shown a list of matching existing tags. You can choose a suggested tag using the up and down arrow keys and insert it by pressing Tab or Enter/Return.
You can also drag items to a tag in the tag selector in the bottom left to quickly add the tag to all of those items.

Removing Tags from Items
To remove a tag from an item, select the item in the items list, click the Tags tab in the right-hand pane, and click the “-” (minus) button next to the tag you want to remove.
You can also hold Cmd (Mac) or Shift (Windows/Linux) while dragging items to a tag in the tag selector in the bottom left to remove the tag from all of those items.
If you've assigned a color to a tag, you can also remove the tag from all selected items by pressing the number key associated with that tag on your keyboard.
Bulk Editing Tags
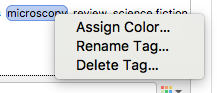
You can use the tag selector to globally rename and delete tags. To rename a tag across all items it is assigned to, right-click the tag in the tag selector and choose “Rename Tag…”. To delete a tag from all items, right-click the tag and choose “Delete Tag…”. You can merge tags by renaming one to have the same name as the other.
Colored Tags
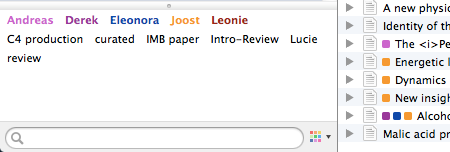
Colored tags appear as small colored squares next to items' titles in the center pane. Colored tags make it easy to quickly scan your library for tags that have a certain tag. Colored tags are shown at the top of the tag selector and are always visible, even if not assigned to any visible items.
Many people use colored tags for “to read” or “favorite” items. They can even contain emojis, which will be displayed directly in the items list in place of a colored square.
You can assign a color to a tag by right-clicking on it and choosing “Assign Color…” In the popup window, select a color from the dropdown box and click “Set Color”. You can remove a color from a tag by right-clicking, choosing “Assign Color…”, and clicking “Remove Color”.
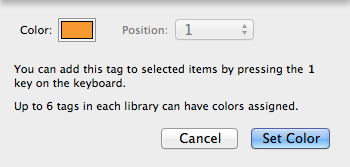
Each colored tag is also assigned a number, corresponding to its position at the top of the tag selector. You can quickly add or remove a colored tag from selected items by typing the corresponding number key on your keyboard. You can change a colored tag's number by right-clicking on it, choosing “Assign Color…”, and choosing a new position.
Up to 9 tags can be assigned colors and numbers. For further documentation see Colored Tags.
Automatic Tags
When items are saved to a Zotero library from the web, tags are sometimes automatically added to items. For example, OPAC library catalogs provide subject headings for their records, which are saved as Zotero tags. Automatic tags behave the same as manually added tags but are marked by a red icon in the “Tags” tab of the right-hand Zotero pane (versus the blue icon for regular tags).
Automatic tags can be hidden from the tag selector by clicking the multi-color button in the lower-right corner of the tag selector and unchecking “Show Automatic”. You can delete all automatic tags from a library by clicking “Delete Automatic Tags in This Library”. To prevent Zotero from adding automatic tags, uncheck “Automatically tag items with keywords and subject headings” in the General pane of Zotero preferences.