 Upgrade Storage
This is an old revision of the document!
Zotero Library에 아이템 추가하기
이 페이지는 단행본, 논문, 웹페이지 등의 서지정보를 Zotero에 아이템으로서 수집하는 다양한 방법을 소개한다. 그 밖에 파일(PDFs, 이미지 등)을 저장하는 법이나 아이템에 파일을 첨부하는 방법에 대해서는 files 페이지를 참고한다.
웹 자원의 수집
Zotero의 가장 편리한 기능 중 하나는 내가 방문하는 페이지 상의 서지 정보를 알아서 찾아내는 기능이다. 예를들어, 도서관 홈페이지에서 책 한 권을 검색하여 보고 있으면, Zotero가 웹브라우저의 주소창 옆에 아래 이미지와 같이 책 모양의 아이콘을 표시해준다.
![]()
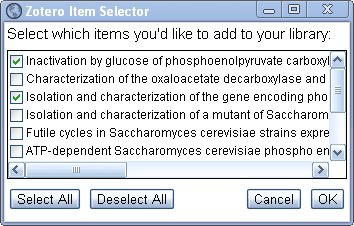
이 책 모양의 아이콘을 클릭하면 Zotero Library로 단행본(서적) 아이템을 신규 생성하여 해당 서지 정보를 자동으로 저장시킨다. Google Scholar같은 일부 웹 사이트에서는 다양한 유형의 자료가 여러 개 보여지는데, 이때는 폴더 모양의 아이콘이 표시된다. 폴더 아이콘을 클릭하면 아래와 그림과 같이 원하는 자료를 선택하여 반입할 수 있다.
![]()
만약 Zotero 윈도우 좌측의 특정 컬렉션을 선택해두면 그 컬렉션으로 아이템이 저장된다. Amazon.com이나 NYTimes.com 등의 웹사이트와 주요 저널 등을 통해 수집이 가능하다. 단, Zotero가 서지사항을 인식할 수 없는 경우도 있다. 해외의 대다수 도서관에서 인식이 가능한데 비해 국내(대한민국)의 대다수 도서관에서는 Zotero를 인식하지 못하는 경우가 많아 국내 도서의 경우 포스텍 청암학술정보관에서 국내 논문의 경우 NDSL, DBPIA(유료) 등의 사이트를 참고할 수 있다. 웹사이트와 Zotero의 호환 여부 즉, 메타데이터의 인식 여부는 주소 창 옆의 아이콘이 생성되는지 여부만 보면 쉽게 알 수 있으며 compatible websites list를 참고할 수 있다.
식별자(Identifier)로 항목추가
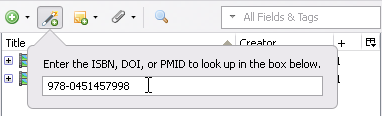
자료의 고유번호를 통해 아이템을 추가할 수도 있다. 단행본의 ISBN, 논문의 DOI(Digital Object Identifier), PubMed ID 등을 알고 있다면, “식별자로 항목추가” 버튼( )을 눌러 해당 식별자를 넣고 엔터만 치면 쉽게 추가가 가능하다. ISBN의 경우WorldCat, 논문 DOI의 경우 CrossRef, PubMed ID는 NCBI PubMed의 데이터베이스를 참고하므로, 일부 국내 단행본의 경우 검색되지 않을 수 있다.
현재 페이지로부터 새 항목 생성
“현재 페이지로부터 새 항목 생성” 버튼( )을 클릭하여 아이템을 생성할 수도 있다. Zotero 환경설정> 일반탭에서 “웹 페이지 항목을 생성할 때 자동으로 스냅샷 저장”을 활성화 시켰다면, 아래 그림과 같이 웹 페이지의 스냅샷 복사본이 아이템의 하위노드로 추가된다. 아이템을 더블 클릭하면 저장된 스냅샷을 볼 수 있다.

Shift키를 누른채로 “현재 페이지로부터 새 항목 생성” 버튼을 누르면 환경 설정에서 해당 기능을 설정했더라도 일시적으로 스냅샷을 저장하지 않고 아이템만 저장한다.
Zotero Standalone 버전 사용자의 경우 저장하고자 하는 웹 페이지에서 마우스 오른쪽 클릭 후 “현재 페이지로부터 Zotero 스냅샷 저장하기”를 선택하여 스냅샷을 포함한 아이템을 생성할 수 있다.
라이브러리에서 스냅샷이 없는 웹페이지 아이템을 더블 클릭하면 해당 웹페이지로 가져다주지만, 스냅샷이 있는 웹페이지를 더블클릭하는 경우는 스냅샷을 대신 보여준다. 이 경우엔 ”URL:” 필드를 클릭하여 해당 웹페이지로 방문할 수 있다.
다른 툴로 반입하기
이미 다른 참고 문헌 관리 툴을 사용하고 있는 경우 Zotero로 라이브러리를 옮길 수 있다. 사용하고는 툴에서 우선 서지 정보를 반출한 후에 Zotero 라이브러리로 반입해야 한다. 반입방법은 톱니바퀴 모양의 “동작” 아이콘을 클릭하여 “불러오기” 한 후, 해당 파일 경로를 지정하여 “열기”하면 된다. Endnote에서 Zotero로 바꾸는 경우는 더 상세한 매뉴얼(Importing Records From EndNote)을 참고할 수 있다.
Zotero로 반입 가능한 서지 형식:
- Zotero RDF
- MODS (Metadata Object Description Schema)
- BibTeX
- RIS
- Refer/BibIX
- Unqualified Dublin Core RDF
단, 반출/반입 기능은 서로 다른 Zotero 설치 버전 사이에 라이브러리 전체를 이동(transferring entire Zotero libraries)하는 경우에는 추천하지 않는다. 반출/반입 기능은 완벽하게 라이브러리를 복사하지 못할 수 있으며, 특히 워드 플러그인을 사용하는 경우 워드 문서 내의 Zotero 아이템으로의 링크를 잃게 될 수도 있다. 대신, Zotero의 sync 기능이나 Zotero data directory를 직접 복사하는 방식으로 이용할 수 있다.
PDF나 다른 파일 추가하기
내 컴퓨터에 있는 PDF, 다른 파일을 첨부할 수 있다. 현재 있는 아이템에 해당 파일을 첨부하고자 하는 경우 내 컴퓨터에 있는 해당 파일을 선택 후 Drag(끌어다두기)하여 첨부하고자 하는 아이템에 가져가면 저장된다. 해당 파일을 별도의 아이템으로 구성하고자 하는 경우엔 아이템 사이에 드래그하여 가져가면 된다.
Zotero 내의 메뉴를 활용하고자 하는 경우엔 녹색 플러스 버튼의 하위 메뉴 중 “파일의 사본을 보존”을 선택하여 별도의 아이템으로 구성하거나, 클립 모양의 “첨부 추가” 버튼을 클릭하여 이미 있는 아이템에 첨부 형태로 파일을 저장할 수 있다.
특히 PDF를 별도의 아이템으로 구성하는 경우 오른쪽 마우스 클릭 후 Retrieve Metadata for PDF를 선택하여 자동으로 서지사항을 추출해 볼 수 있다.
아이템 직접 추가/수정하기
직접 추가하기
직접 아이템을 입력하기 위해서는 녹색의 “새항목”( ) 버튼을 클릭한다. 이때 드롭다운 메뉴를 클릭하면 다양한 유형의 자료 유형을 선택할 수 있다. 최근 사용한 자료의 유형이 보여지며, “더보기”를 클릭하면 더 다양한 유형의 자료를 선택할 수 있다. 선택한 유형에 따라 다른 필드가 공백 상태로 보여지며, 여기에 직접 서지 사항을 입력하면 된다.
유의사항 웹페이지로 아이템을 만들고자하 는 경우, 해당 페이지를 방문하여 웹 페이지 저장하기(see Saving Web Pages) 기능을 쓰는 것이 가장 쉬운 방법이다. 이 때문에 신규 아이템 유형에서는 웹페이지 항목을 찾아볼 수 없다. 그래도 직접 웹 페이지 아이템을 추가하고자 하는 경우에는 아무 유형으로 선택하여 생성한 후 오른쪽 마우스 클릭하여 웹 페이지 형식으로 바꿀 수 있다.
Editing Items
When you have selected an item in the center column, you can view and edit its bibliographic information via the Info tab of the right column. Most fields can be clicked and edited. Changes are saved automatically as they are made. Some fields have special features, which are discussed below.
Names
Each item can have zero or more creators, of different types, such as authors, editors, etc. To change the creator type, click the creator field label (e.g., “Author:”). A creator can be deleted by clicking the minus button at the end of the creator field, and additional creator fields can be added by clicking the plus button at the end of the last creator field. Creators can be reordered by clicking a creator field label and selecting “Move Up” or “Move Down”.
Each name field can be toggled between single and two field mode by clicking the “Switch to single field” / “Switch to two fields” buttons at the end of the creator field. Single field mode should be used to institutions (e.g., when the author is “Company A”), while two field mode (last name, first name) should be used for personal names.
Journal Abbreviations
Journal articles are often cited with the abbreviated journal title. Zotero stores the journal title and journal title abbreviation in separate fields (“Publication” and “Journal Abbr”, respectively). While some citation styles require different abbreviations, most of the variation is in whether or not the abbreviation contain periods (e.g., “PLoS Biol” or “PLoS Biol.”). Because removing periods is more accurate than adding them, we recommend that you store title abbreviations in your Zotero library with periods. Zotero can then reliably strip out the periods in rendered bibliographies when the chosen citation style calls for it.
Titles
In English, titles are typically either Title Cased or Sentence cased (for the distinction, see http://blog.apastyle.org/apastyle/2012/03/title-case-and-sentence-case-capitalization-in-apa-style.html ). Because citation styles differ in their casing requirements, and because automatic conversion of sentence case to title case is much more accurate than the other way around, we recommend that you store titles in your Zotero library in sentence case. Zotero can then reliably convert titles to Title Case in rendered bibliographies when the chosen citation style calls for it.
To help with changing the case of titles, the title fields (e.g., “Title”, “Publication”, “Series Title”, “Short Title” for the “Journal Article” item type) can be right-clicked. This shows the “Transform Text” menu, with options to convert the title to either “Title Case” or “Sentence case”. Zotero does not recognize proper nouns, and transformed titles should always be checked for capitalization errors.
Links
Clicking the label of the URL (“URL:”) and DOI (“DOI:”) fields will open up the (DOI-resolved) URL in your web browser.